Trigger an Azure Function (PowerShell) from an Azure DevOps Pipeline

When I recently heard the announcement for Public Preview of PowerShell in Azure Functions 2.x, I was excited to give it a test drive. One of the first use cases I thought of was using this for custom scripts that run on a build server. For example, a PowerShell script that generates some sort of report and emails users with the results. Rather than running this on a build server, we can use Azure Functions to reap some of the benefits of serverless. In this post I’ll walk through setting up an Azure Function that’s triggered by an Azure Pipelines release definition via HTTP.
Creating the PowerShell Azure Function
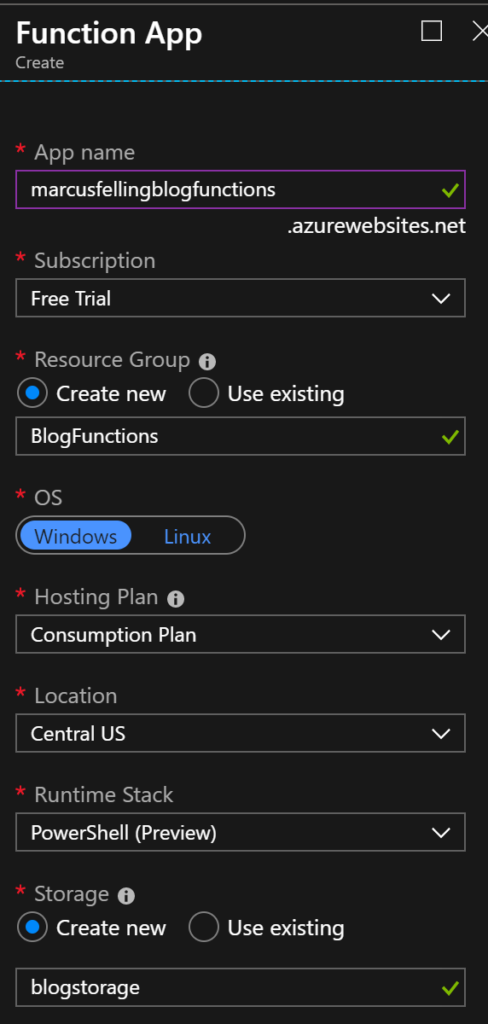
First up is creating the function app. There is plenty of documentation on this so I’ll skip the details. The main thing to select here is the Runtime Stack: PowerShell (Preview). Here is what mine looks like:
Next, create a function with an HTTP trigger. This will be a function that will be run whenever it receives an HTTP request, responding based on data in the body or query string. We’ll be sending the HTTP request from within an Azure DevOps Pipeline in later steps.

There are 2 files created by default: run.ps1 and function.json. Run.ps1 will contain our PowerShell logic that’s executed when there is an HTTP trigger. For this example, I’m getting a list of release definitions from an Azure DevOps project. My run.ps1 file looks like this:
I’ll let you read through the comments to figure out what each step does. The main things to note:
- Input bindings, found in function.json, are passed via parameter block
- The Personal Access Token (PAT) that’s required to call the Azure DevOps REST API is passed via query string.
- StatusCode and Body values are associated to output bindings by calling ‘Push-OutputBinding’ at the end of the script
Test the function by running it in the Portal and the console should display output indicating success
2019-05-19T19[Information] Executing 'Functions.HttpTrigger1' (Reason='This function was programmatically called via the host APIs.', Id=d5eb9d77)
2019-05-19T19 [Information] OUTPUT: PowerShell HTTP trigger function processed a request.
2019-05-19T19 [Information] Executed 'Functions.HttpTrigger1' (<strong>Succeeded</strong>, Id=d5eb9d77)
Triggering the Azure Function via Azure Release Pipeline
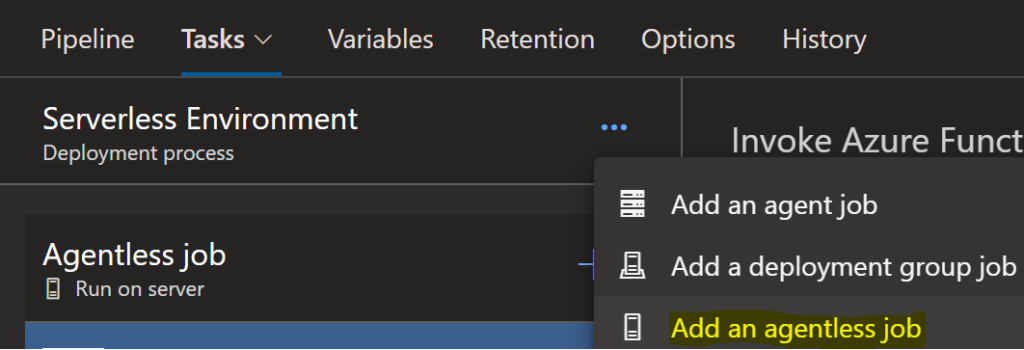
Now that we have a function created, we can use Azure Pipelines to trigger it. First up we’ll create an Agentless Job in a new or existing release definition. This will give us a super fast execution of tasks, unlike waiting on hosted or private build agents that can take a while to pick up the tasks and execute them. Click the ellipsis in the environment block -> Add an agentless job.
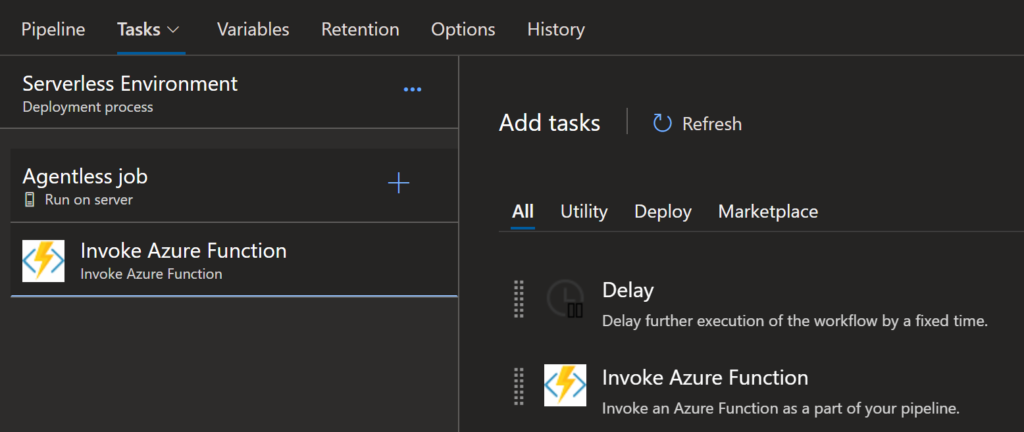
Add the “Invoke Azure Function” task to the new agentless job:
Now we can configure the task.
- Grab the Azure Function URL from the Azure Portal. It’s on the top level Azure Function Apps page under Overview. Add the name of your HTTP trigger function to the base url + /api/. In this example, I used https://marcusfellingblogfunctions.azurewebsites.net/api/HttpTrigger1
- Function Key can also be found in the portal under Functions – > Trigger Name -> Manage. I generated a new key and store it as a secret variable in my release definition.
- For this example I used Method: GET and left the default Headers
-
For Query Parameters I used PAT and passed it as a secret release definition variable.
This resulted in my task looking like this:

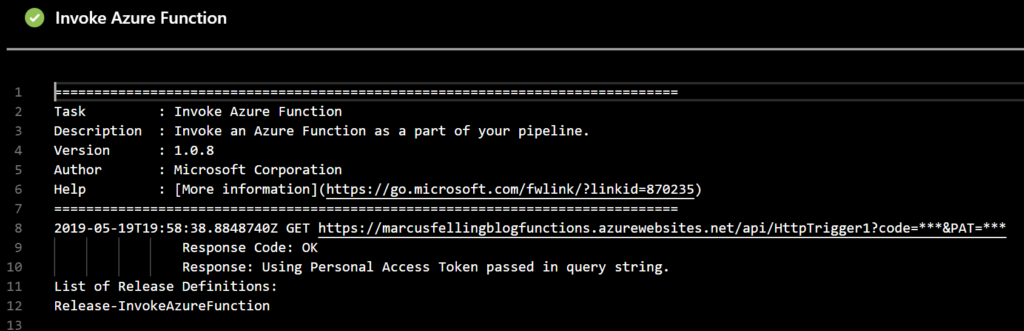
Creating and running a new release results in a log that outputs the response and body.
Conclusion
This blog post outlines just one of many script scenarios that could be used. I wanted to outline how easy it is to get started. By using Azure Functions in conjunction with Azure Pipelines, we’re able to take advantage of the consumption pricing model (hopefully saving money), reduce the amount of servers we need to manage, and can scale infinitely as our solutions grow.
I’m looking forward to seeing all of the different ways this can be used. Post in the comments and share your uses of Azure Pipelines with Azure Functions.